1. Download & Image Selection
Q1: Where can I download the official deepin 25 ISO image?
A: Visit the official download page: https://www.deepin.org/en/download/
Q2: How do I choose the correct image for my computer?
A: Select the image according to your processor architecture:
| Architecture | Supported Processors (Examples) | Notes |
|---|---|---|
| AMD64 (x86_64) | Intel Core, AMD Ryzen | Most common; suitable for the vast majority of personal computers |
| ARM64 | Phytium D2000/D3000/E2000/S2500/S5000C, Kunpeng 920 | For Chinese ARM platforms |
| Loong64 | Loongson 3A5000 (requires New World firmware) or newer | Must use balenaEtcher or the dd command to create bootable media |
| RISC-V | Specific RISC-V development boards only | Technology preview; not for daily use |
2. Hardware Requirements
Q3: What are the minimum and recommended hardware requirements for deepin 25?
| Component | Recommended Configuration |
|---|---|
| Processor | Intel 6th Gen Core (3.2 GHz) or AMD Zen2 (3.6 GHz) or better |
| Memory | At least 8 GB |
| Storage | At least 64 GB SSD |
| Boot Mode | UEFI (Legacy can be used on pre‑2012 machines) |
| Graphics | Integrated or discrete GPU (NVIDIA 8xx series or newer; older GPUs lack official drivers) |
| Display | 1920×1080 or higher resolution |
Q4: Can I install deepin 25 with only 4 GB of RAM / 32 GB of disk space?
A: Not recommended. Less than 8 GB of RAM or 64 GB of disk space will lead to installation failure or severe performance issues.
3. Pre‑installation Preparation
Q5: Do I need to back up my data before installing deepin 25?
A: Strongly recommended. Especially for:
- Single‑disk users: back up important data to an external drive or cloud storage.
- Dual‑disk users: if you choose full disk installation, the other disk will be formatted.
- Existing deepin 20/23 users: direct upgrade is not supported; you must perform a clean installation and back up your /home partition data in advance.
Q6: Is it necessary to disable Secure Boot?
A: Recommended. Enter BIOS and set Secure Boot to Disabled. Otherwise you may be unable to boot from the USB drive, or experience issues with out‑of‑tree drivers and system suspend.
Q7: How do I choose between UEFI and Legacy boot mode?
A: Depends on your computer’s age:
- Most computers manufactured after 2012 should use UEFI mode.
- For pre‑2012 machines (e.g., old Core 2, first‑gen Core, or equivalent AMD processors) that only support Legacy – just use full disk installation; no further adjustment is needed.
Q8: Do I need to create a separate partition for deepin 25?
A: Optional.
- If you are familiar with partitioning, you can create a ≥64 GB empty partition in Windows/macOS and select it during installation.
- If you are not comfortable with partitioning, use full disk installation (note that this will format the entire disk – back up your data first).
4. Creating a Bootable USB Drive
Q9: What capacity USB drive is required? Will creating the bootable drive erase my data?
A: You need a ≥8 GB USB drive. The process will format the drive, so please back up any data on the USB drive beforehand.
Q10: Which tools are recommended for creating the bootable drive?
| Tool | Supported Systems | Features |
|---|---|---|
| Ventoy | Windows / Linux / macOS | Create once, then copy multiple ISO files – choose which to boot |
| balenaEtcher | Windows / Linux / macOS | Simple and easy; required for Loong64 |
| Rufus | Windows only | Classic tool |
dd command |
Linux terminal | For users comfortable with the command line |
dd command example:
(Replace /path/to/deepin.iso with the actual path to your ISO, and /dev/sdx with your USB device – check with lsblk.)
5. Installation Process
Q11: How do I boot from the USB drive and start the installation?
A:
1. Insert the bootable USB drive.
2. Restart your computer and press the appropriate key to enter the BIOS boot menu (common keys: Lenovo F12, HP F9, Dell ESC/F12, ASUS F8; for Intel‑based Mac, hold option).
3. Select the USB drive (e.g., UEFI USB or USB HDD) as the first boot device.
Q12: Can I try deepin 25 before installing it?
A: Yes. On the boot menu, choose “Try Deepin Desktop 25” – this enters a live session where you can test hardware compatibility (WiFi, Bluetooth, audio, etc.).
Q13: What is the difference between Full Disk Installation and Manual (Custom) Installation?
| Installation Type | Features | Suitable for |
|---|---|---|
| Full Disk | One‑click installation, automatically creates A/B partitions, supports system rollback | Beginners, single‑disk users |
| Manual (Custom) | Customize EFI, swap, /, /home etc., supports dual‑boot |
Advanced users, multi‑disk users |
Q14: What partition layout is recommended for manual installation?
| Partition | Recommended Size | Notes |
|---|---|---|
| EFI | 300 MB | Required, FAT32 format |
| swap | Equal to physical RAM (can be reduced if RAM ≥8 GB) | Required when RAM < 8 GB |
/ (root) |
≥45 GB (allocate more if disk space permits) | System installation location |
/home |
Remaining space | User personal data |
Q15: How do I choose the kernel version during installation?
A:
- If you have newer hardware (e.g., Intel Ultra series), it is recommended to choose the 6.18 high‑version kernel for better driver support.
- If your hardware is older, choose the 6.6 kernel for better stability.
6. Common Issues & Solutions
Q16: Black screen or cannot enter graphical interface during installation – what should I do?
A: If you have an NVIDIA GPU (especially the newer RTX 50xx series), this is likely a driver issue.
Solution:
1. After selecting the installation type (Full Disk / Manual) and before confirming formatting, uncheck the option “Integrate NVIDIA proprietary driver”.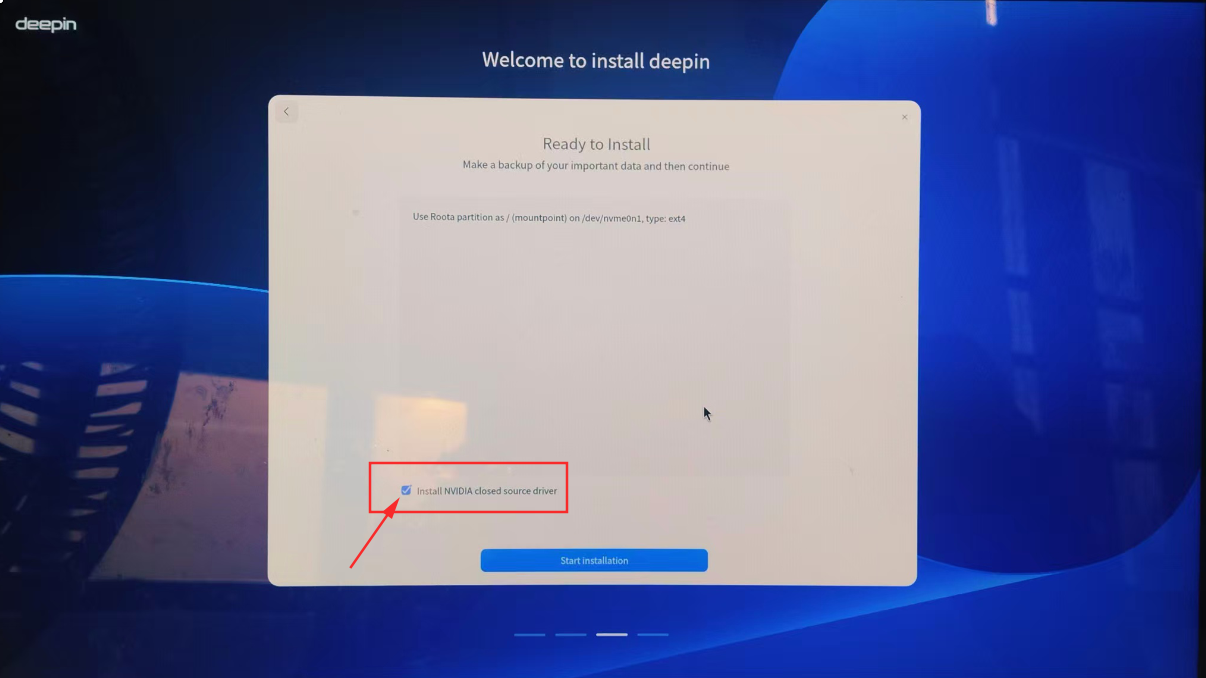
2. After installation, the system will boot using the open‑source Nouveau driver. Then re‑install the NVIDIA proprietary driver.
Q17: “Secure Boot not disabled” prevents booting from the USB drive?
A: Reboot, enter BIOS, set Secure Boot to Disabled, save and exit.
Q18: After installation, the system reboots and says “No bootable device” – what to do?
A: Enter BIOS, change Boot Mode from Legacy to UEFI, then reinstall the system.
Q19: Can I upgrade directly from deepin 20 or 23 to deepin 25?
A: No. The changes are too significant; you must perform a clean installation using the ISO.
Q20: Can I install deepin 25 on a Mac?
A: Yes, but only on Intel‑based Macs (M‑series Macs are not supported). During boot, hold the option key and select EFI boot to start from the USB drive.
Q21: What should I pay attention to when installing deepin 25 in a virtual machine?
A: Recommended virtualisation software: VirtualBox, VMware.
- Enable EFI boot when creating the VM.
- Allocate at least: 2 CPU cores, 4 GB RAM, 64 GB disk (for better performance, allocate 4 cores / 8 GB RAM if your host machine permits).
Q22: As a developer who wants to customise the system, how do I disable the read‑only protection of the “Solid” immutable system?
A: To disable read‑only protection, run the following command (reboot is required after execution):
Alternatively, go to Control Center → System → Developer Options and turn off “Solid read‑only protection”, then reboot.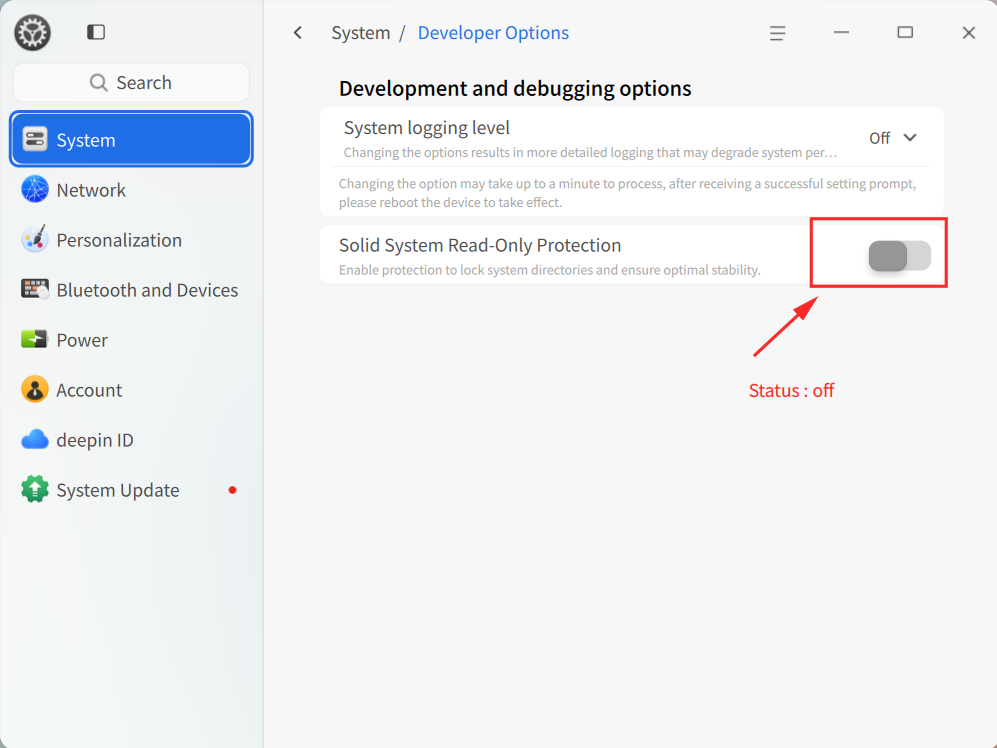
For more Q&A about the Solid immutable system, please read: Solid Q&A | deepin 25 Common Questions – The Immutable System Edition
If you need more detailed step‑by‑step instructions or encounter issues not covered above, please visit the deepin community website or the forum.